Conectarse
Los posteadores más activos de la semana
| Quincho96 | ||||
| Davitroon | ||||
| UFHDE | ||||
| Mathaloz | ||||
| Coldfusion | ||||
| Sirillium64 | ||||
| Paul_q_f |
Los posteadores más activos del mes
| Quincho96 | ||||
| FlairDreamer | ||||
| Sirillium64 | ||||
| UFHDE | ||||
| Coldfusion | ||||
| Davitroon | ||||
| El Destructor de Especies | ||||
| SartekChaos | ||||
| Max | ||||
| Endy |
Creación Aleatoria

Hora Mundial
My tutorial of sketchfab 3D creature viewer (v2?
Página 1 de 1. • Comparte
 My tutorial of sketchfab 3D creature viewer (v2?
I remember talking to Data about putting creatures into sketchfab and said I would do this tutorial, so here it is. Why did I make this tutorial when Wig had already made it? Well, Wig's tutorial is outdated and won't work with sketchfab's new update. If you follow Wig's tutorial with sketchfab's current update, your creature would deform terribly.
Data, when you read this..I'm sorry for making you wait a whole eternity I'm dealing with some real life stuff ;-;
_Please read everything in here so you will not miss any important bits.
Okay, the requirements.That is
 for the colladaexport cheat. Note: Your spore must be in English to activate this cheat
And some programs:
 That is blender (I'm using version 2.79 other blender versions would work just fine.) and Autodesk FBX Converter 2013.
This tutorial will be a little more complicated than wig's tutorial, I'm sorry this is the only way I know of.
1. First, open the creature editor. Pick any creature, then switch to paint mode Open the cheat concole (ctrl+shift+c) then type in ''colladaexport''

2. Navigate to your creatures folder. Go to \Documents\My Spore Creations\Creatures
Find it's ''.dae'' and texture files, so 4 files in total. Cut and paste it somewhere where you can have easy access to it
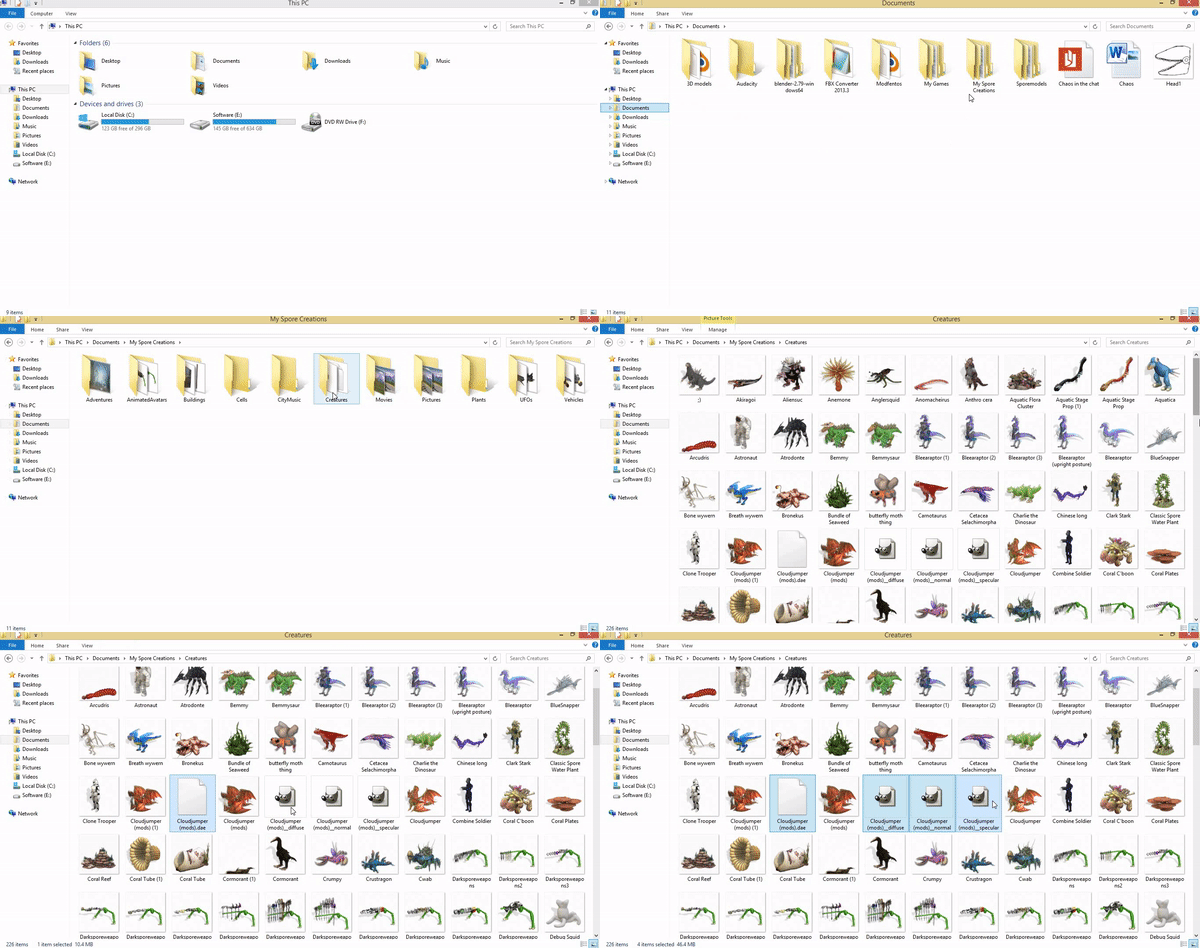
3. Open the fbx converter and drag in the ''.dae'' file. Then click convert! After clicking convert, go find the fbx file. It should be in the same destination as your ''.dae'' file.
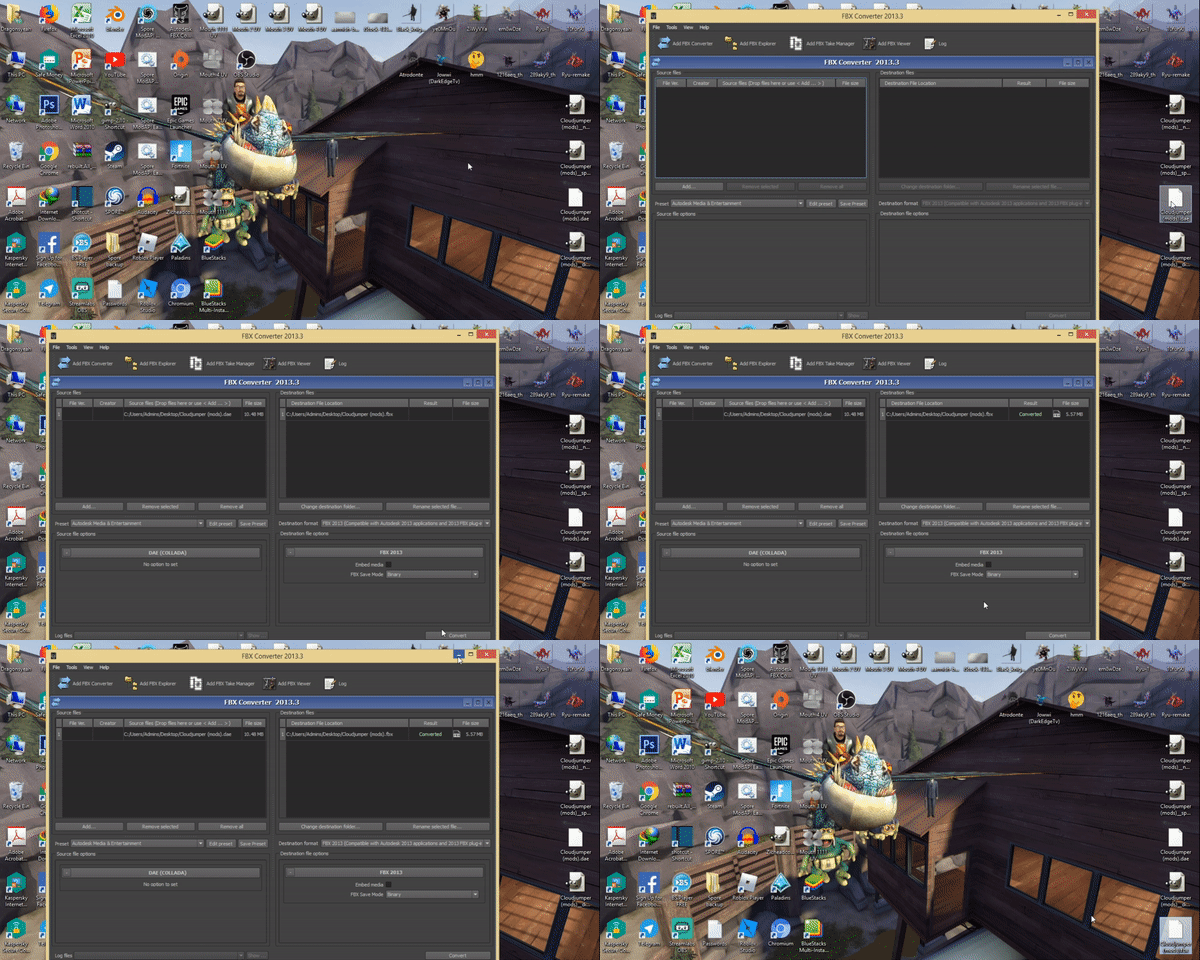
4. Go to the fbx converter again, drag the ''fbx'' file into the converter, and then.. in the destination format drop down menu chose OBJ then click convert!
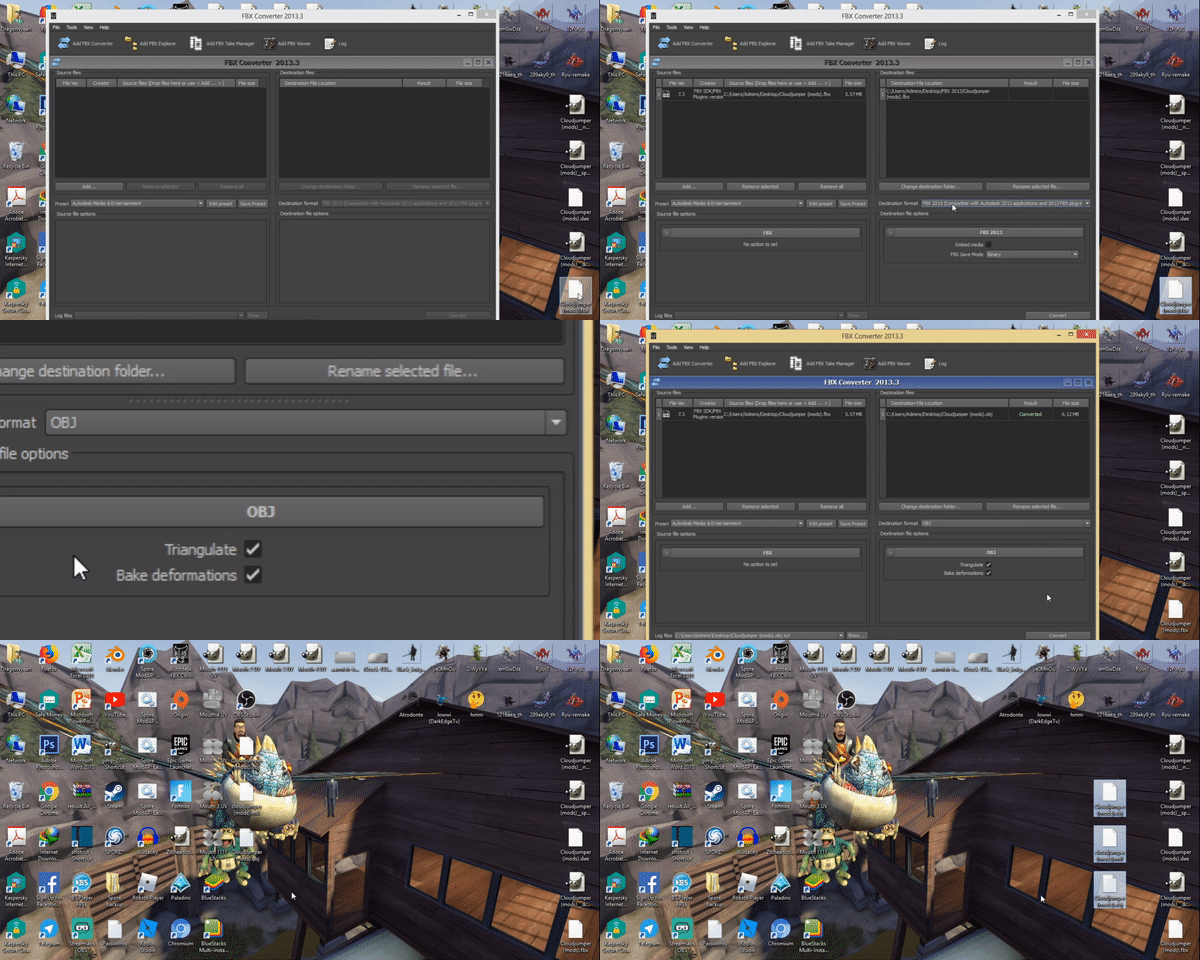
The fbx part ends here.
1. Open blender you will find a cube in there but we don't need that so delete it, go to file --> Import --> Wavefront (.obj) and find your creature. When picking the file DO NOT pick the .mlt one. Pick the one that says .obj
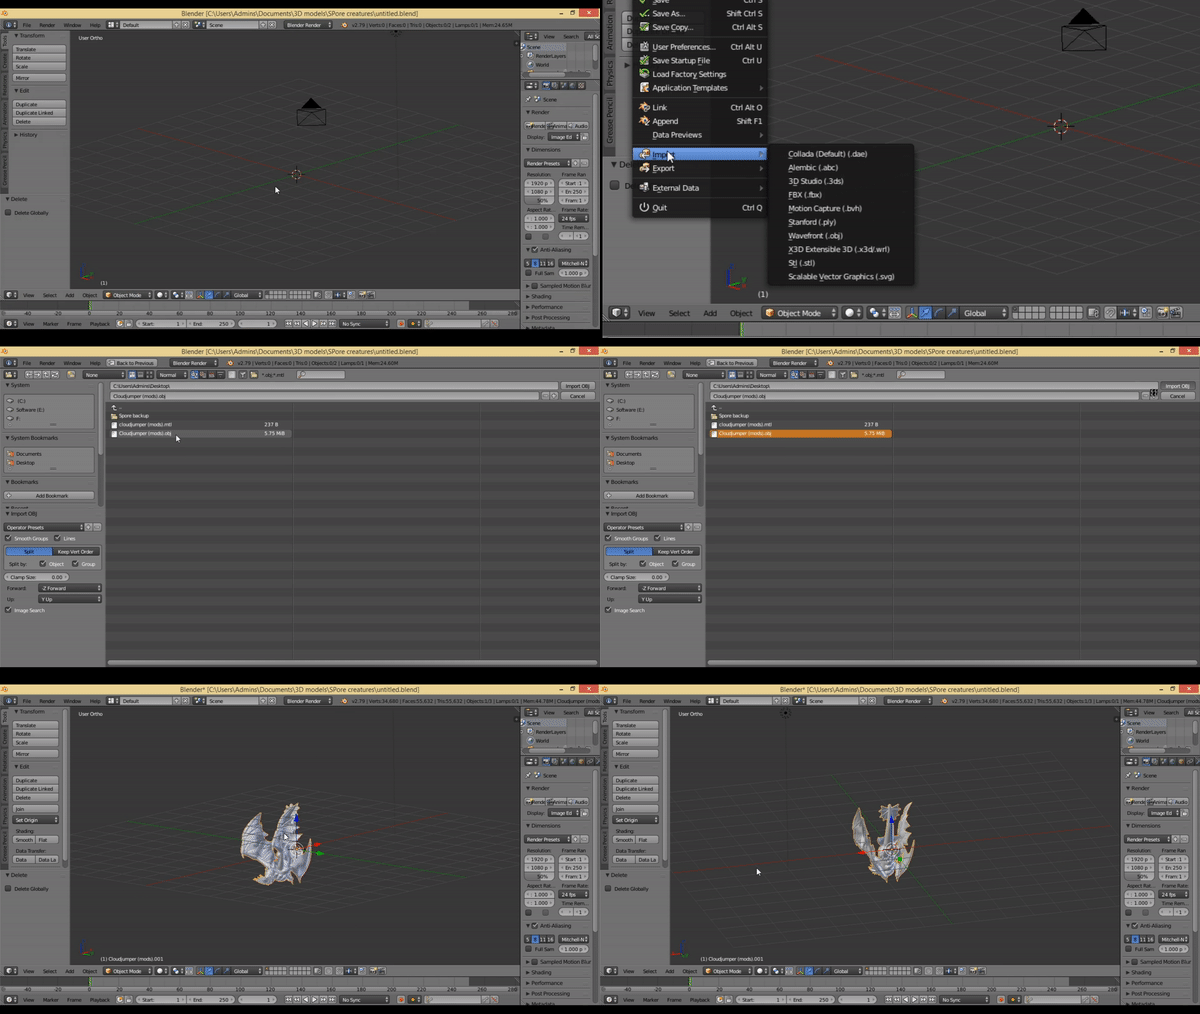
2. You may want to rotate your creature, press r on your keyboard and press x and type 270.
3. Time for the textures to display properly. First, switch from blender render to cycles render.

Click on ''materials'' on the side menu and click ''use nodes''

Find a button at the bottom that says: ''Current editor type for this area'' Click on it and click on ''node editor''
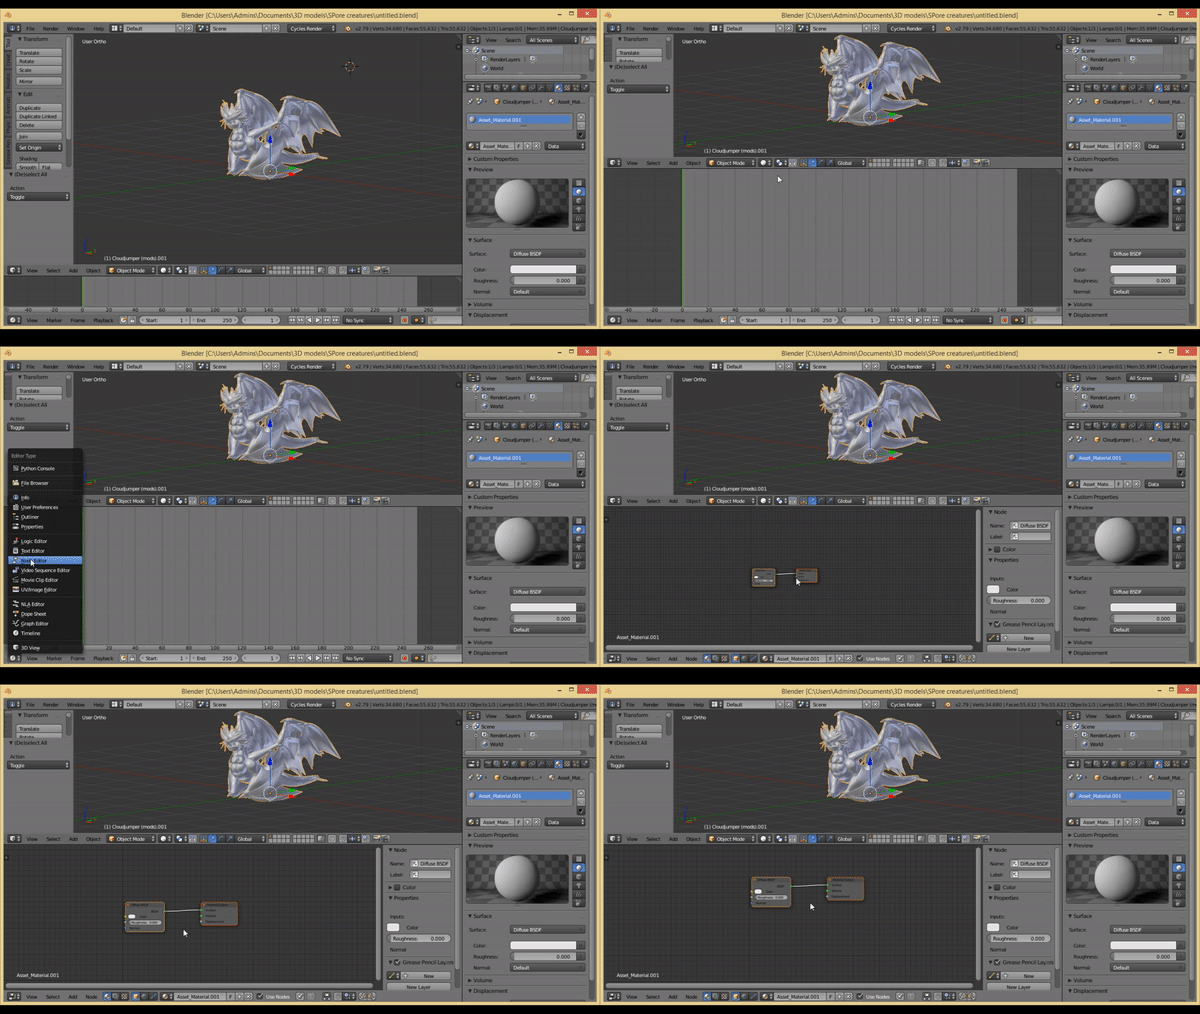
Now, this part is where you will have to build some kind of node tree for the textures and materials.
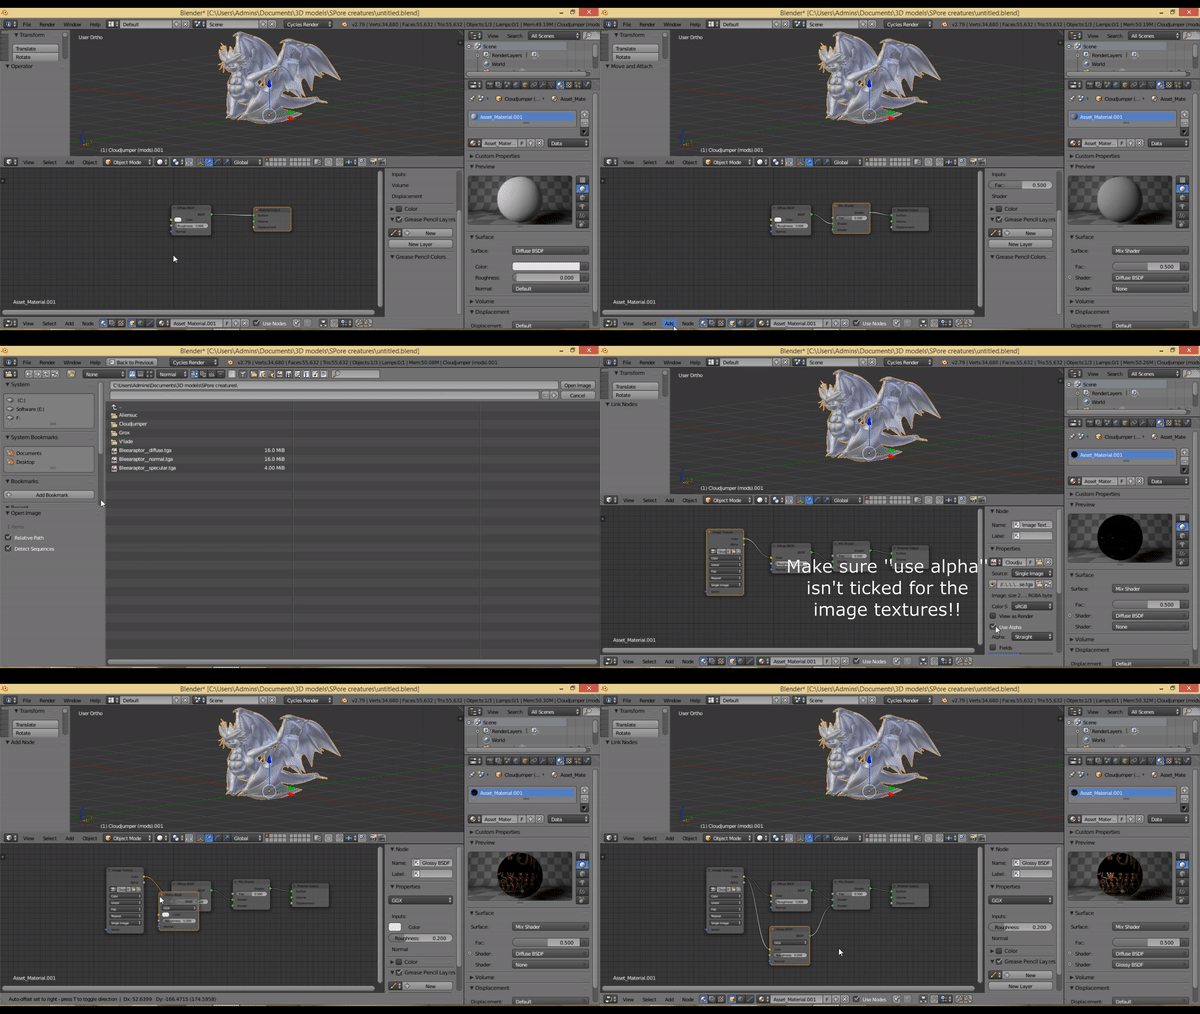
In the node editor, go to add ---> shader and pick mix shader.
Drag the mix shader and put it in between materials BSDF and material out put so that it's nodes are connected.
Go to add ---> texture ---> image texture and find the .diffuse file of your creature
Connect the colour node of the image texture to the Diffuse BSDF
Make sure ''use alpha'' ISN'T TICKED for the image texture
Next go to add ---> shader ---> Glossy BSDF.
Connect the colour node from the image texture to the colour node of the Glossy BSDF then connect the BSDF node of the Glossy BSDF to the shader node of the mix shader. As demonstrated in the gif.
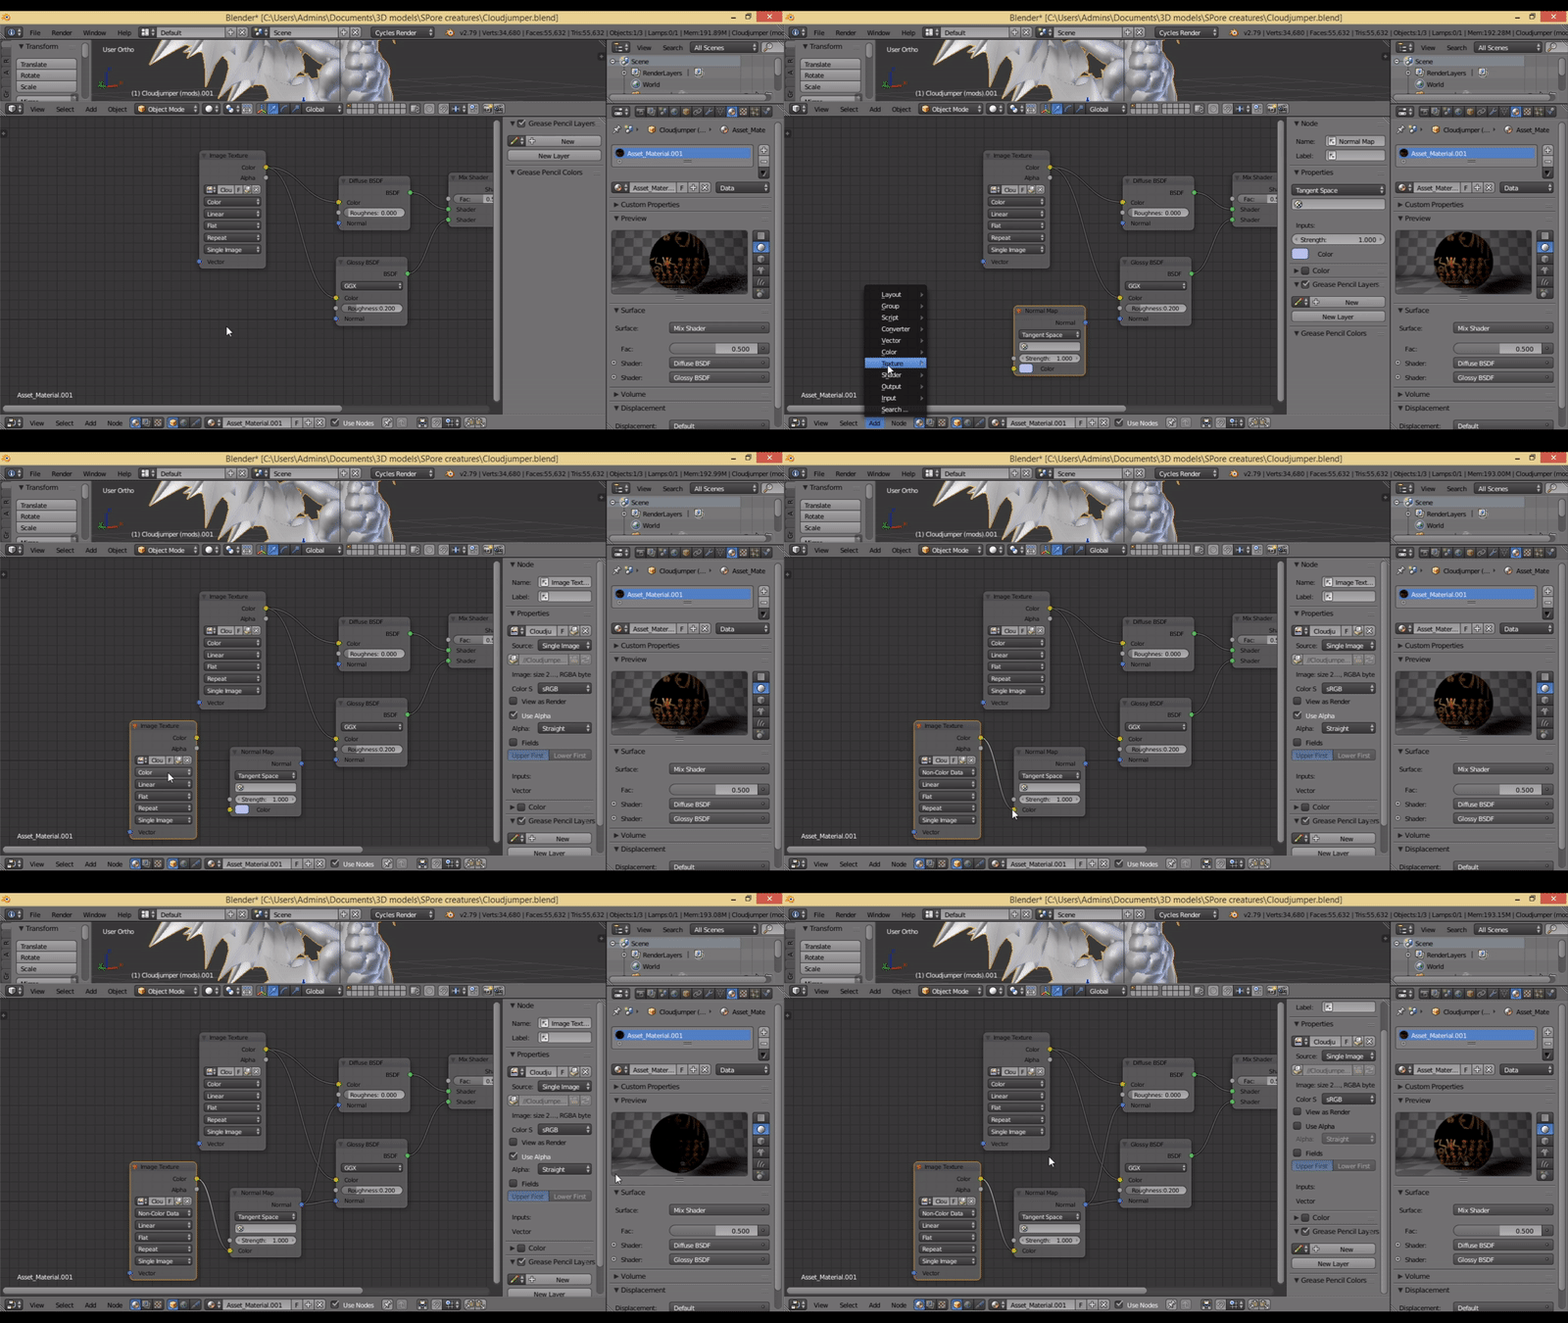
Now, time for the normal maps.
Go to add ---> vector --> normal map.
Then go to add ---> image texture, click open and locate the normal.tga file.
Make sure you select ''Non-colour data'' in the node and that ''Use Alpha'' is NOT ticked.
Now well, this part is a bit hard to explain so do what this gif does :v
4. Go to file ---> external data and tick the box that says ''Automatically pack into .blend''

Sometimes, you can see an error pop up. The error usually does not effect the creature model in the sketchfab viewer, if it DOES however follow the next step, if it DOESN'T then SKIP the next step.
This step is only for just in case the creature model does not display it's texture properly in the sketchfab viewer.

Select the one with ''(identical)'' at the end.

As for the next node just do the same thing with the first node.

Sometimes, the error will pop up again but it won't do anything this time.
We are now done with the textures.
1. Go to sketchfab, if you don't have an account create one. Click on the upload button on top of the page.

2. Drag the .blend file into the window.

3. We'll work with the materials again, go to 3D settings

4. Find the normal/bumpmap section, turn it on.

Click on manage textures

Find the normal.tga and click on it.

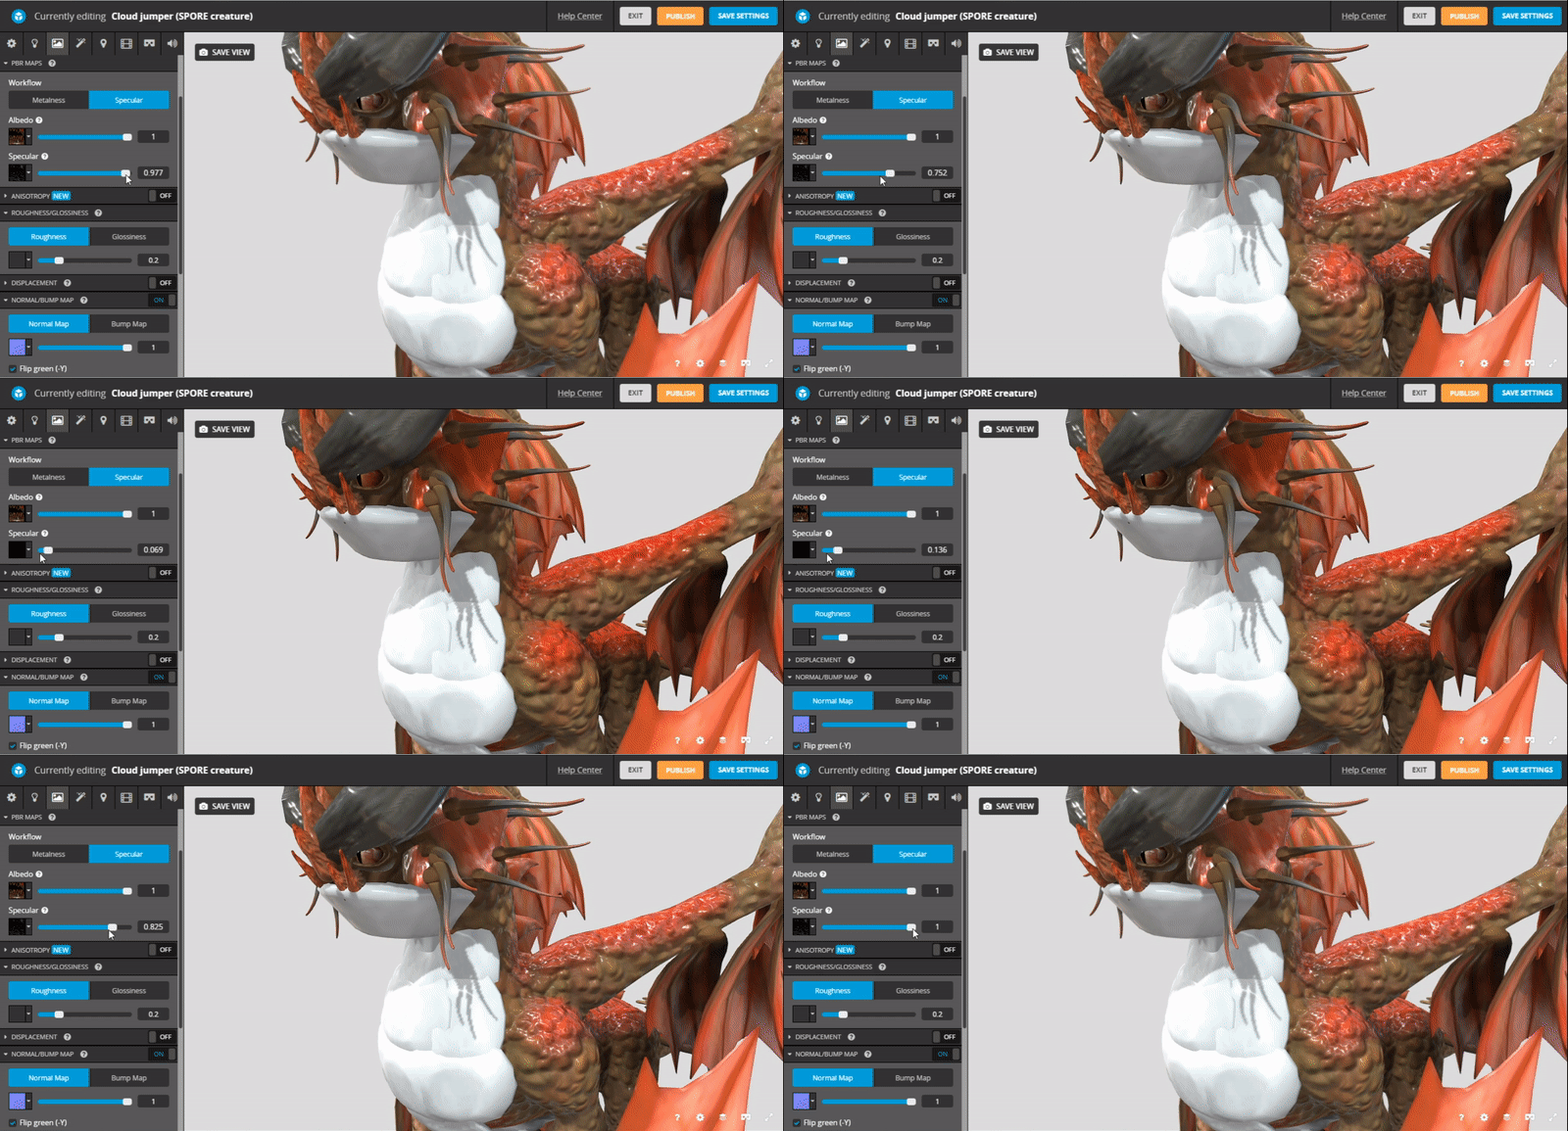
Now go to the specular section, click on manage textures.

Click on ''Import texture'' and locate the specular.tga file.

And now you're pretty much done with the textures!

You can continue to play around with sketchfab's sliders and settings as much as you want. It's your own freedom now. When you're done, you can publish your creature model!
One final step after uploading your creature, to bring the viewer here to this website, click on ''embed'' that is located right underneath the viewer.

Copy and past the code then you're done!
The tutorial has come to an end. If you got any questions or find any mistakes, please notify me c: I will try and help you out.

Data, when you read this..I'm sorry for making you wait a whole eternity
 I'm dealing with some real life stuff ;-;
_Please read everything in here so you will not miss any important bits.
Okay, the requirements.That is

 for the colladaexport cheat. Note: Your spore must be in English to activate this cheat
And some programs:

 That is blender (I'm using version 2.79 other blender versions would work just fine.) and Autodesk FBX Converter 2013.
This tutorial will be a little more complicated than wig's tutorial, I'm sorry this is the only way I know of.
Please read this. If you use pandora's tool box for your creature the coloured pieces would deform back to their original state, I couldn't find any way to fix this I realized half way through making the tutorial and it made me alter my creature slightly. So be careful with what mods you're using.
Ready? let's start:

2. Navigate to your creatures folder. Go to \Documents\My Spore Creations\Creatures
Find it's ''.dae'' and texture files, so 4 files in total. Cut and paste it somewhere where you can have easy access to it

3. Open the fbx converter and drag in the ''.dae'' file. Then click convert! After clicking convert, go find the fbx file. It should be in the same destination as your ''.dae'' file.

4. Go to the fbx converter again, drag the ''fbx'' file into the converter, and then.. in the destination format drop down menu chose OBJ then click convert!

The fbx part ends here.
The blender bit

2. You may want to rotate your creature, press r on your keyboard and press x and type 270.
3. Time for the textures to display properly. First, switch from blender render to cycles render.

Click on ''materials'' on the side menu and click ''use nodes''

Find a button at the bottom that says: ''Current editor type for this area'' Click on it and click on ''node editor''

Now, this part is where you will have to build some kind of node tree for the textures and materials.
In the node editor, go to add ---> shader and pick mix shader.
Drag the mix shader and put it in between materials BSDF and material out put so that it's nodes are connected.
Go to add ---> texture ---> image texture and find the .diffuse file of your creature
Connect the colour node of the image texture to the Diffuse BSDF
Make sure ''use alpha'' ISN'T TICKED for the image texture
Next go to add ---> shader ---> Glossy BSDF.
Connect the colour node from the image texture to the colour node of the Glossy BSDF then connect the BSDF node of the Glossy BSDF to the shader node of the mix shader. As demonstrated in the gif.

Now, time for the normal maps.
Go to add ---> vector --> normal map.
Then go to add ---> image texture, click open and locate the normal.tga file.
Make sure you select ''Non-colour data'' in the node and that ''Use Alpha'' is NOT ticked.
Now well, this part is a bit hard to explain so do what this gif does :v

4. Go to file ---> external data and tick the box that says ''Automatically pack into .blend''

Sometimes, you can see an error pop up. The error usually does not effect the creature model in the sketchfab viewer, if it DOES however follow the next step, if it DOESN'T then SKIP the next step.
This step is only for just in case the creature model does not display it's texture properly in the sketchfab viewer.
Do not follow this next step if your creature textures display properly in sketchfab.
Select one of the image texture nodes, click on the icon with the image of paper coming out of a box.
Select the one with ''(identical)'' at the end.

As for the next node just do the same thing with the first node.

Sometimes, the error will pop up again but it won't do anything this time.
We are now done with the textures.
Time for uploading

2. Drag the .blend file into the window.

3. We'll work with the materials again, go to 3D settings

4. Find the normal/bumpmap section, turn it on.

Click on manage textures

Find the normal.tga and click on it.

Now go to the specular section, click on manage textures.

Click on ''Import texture'' and locate the specular.tga file.

And now you're pretty much done with the textures!

You can continue to play around with sketchfab's sliders and settings as much as you want. It's your own freedom now. When you're done, you can publish your creature model!

One final step after uploading your creature, to bring the viewer here to this website, click on ''embed'' that is located right underneath the viewer.

Copy and past the code then you're done!
The tutorial has come to an end. If you got any questions or find any mistakes, please notify me c: I will try and help you out.
Última edición por Dragonguy2005 el Jue 31 Oct 2019, 07:07, editado 1 vez (Razón : TYPO >:C)

Your Local Gringo
 It is I, the Foreigner of the Forum, Mindless Metalhead, and Rock N Roll Junkie
Zic- Caballero Hombre de armas

- Puntos de Capitán : 195
Actividad de Arquetipos : Ver
Barra de Respeto : Mensajes : 1187
Sexo :
Localización : I'm in my mums car!
¿Algo que decir? : Courtesy Costs Nothing.
Fecha de inscripción : 16/07/2018
Premios :


-


 Re: My tutorial of sketchfab 3D creature viewer (v2?
Hey, looks really good!
I think I saw a post before about this too, but anyways it's your way to explain it.
Maybe I'll use this someday...someday that I will make another creature
I think I saw a post before about this too, but anyways it's your way to explain it.
Maybe I'll use this someday...someday that I will make another creature


Davitroon- Comerciante Contrabandista

- Puntos de Capitán : 62
Actividad de Arquetipos : Ver
Barra de Respeto : Mensajes : 2164
Sexo :
Edad : 18
Fecha de nacimiento : 02/02/2006
Localización : Far Far Away
¿Algo que decir? : ¡Larga vida a Arstotzka!
Fecha de inscripción : 08/12/2016
Premios :


-


 Re: My tutorial of sketchfab 3D creature viewer (v2?
Como explica Dragonguy, el problema fue una actualización de Sketchfab a inicios del año, dicha actualización arruino la forma en que la plataforma procesa el modelo que exporta Spore.
Desafortunadamente tras 8 meses los de sketchfab simplemente se lavaron las manos diciendo que probáramos otros métodos para puentear el asunto, por ejemplo, meter el modelo a Blender, guardarlo y luego subirlo a Sketchfab, cosa que es bastante molesto vamos, sobretodo por que en Blender se modifican muchas partes de las criaturas (Tamaño forma y posición incluso).
Fuente: [Tienes que estar registrado y conectado para ver este vínculo]
Gracias por el tutorial Dragon , es una lastima que por culpa de Sketchfab se complique tanto lo que antes era tan fácil de hacer.
Desafortunadamente tras 8 meses los de sketchfab simplemente se lavaron las manos diciendo que probáramos otros métodos para puentear el asunto, por ejemplo, meter el modelo a Blender, guardarlo y luego subirlo a Sketchfab, cosa que es bastante molesto vamos, sobretodo por que en Blender se modifican muchas partes de las criaturas (Tamaño forma y posición incluso).
Fuente: [Tienes que estar registrado y conectado para ver este vínculo]
Gracias por el tutorial Dragon
 , es una lastima que por culpa de Sketchfab se complique tanto lo que antes era tan fácil de hacer.


BAD_DATA- Científico Profesor

- Puntos de Capitán : 285
Actividad de Arquetipos : Ver
Barra de Respeto : Mensajes : 1489
Sexo :
Edad : 28
Fecha de nacimiento : 26/05/1996
Localización : Ciudad de México, México.
¿Algo que decir? : "Ya dejeme Sr. Dominos, me lastima"
Fecha de inscripción : 02/01/2013
Premios :


-


 Re: My tutorial of sketchfab 3D creature viewer (v2?
Parece que se puede subir directamente el archivo FBX sin necesidad de usar Blender. Luego se puede modificar, rotar y añadir las texturas dentro de Sketchfab.

Mx3brainpower- Científico Teórico

- Puntos de Capitán : 783
Actividad de Arquetipos : Ver
Barra de Respeto : Mensajes : 5401
Sexo :
Edad : 33
Fecha de nacimiento : 09/02/1991
Localización : Runaterra
¿Algo que decir? : Mi conexión ya no es tan mala
Fecha de inscripción : 26/06/2012
Premios :


-


 Temas similares
» Problema en Sketchfab con los modelos exportados de spore.
» [Tutorial]Hacer un 'Tutorial' de las funciones del staff para curiosos y para ayudar
» [Súper fácil] Visualizador 3D de Criaturas para tus posts! [Sketchfab] [DESACTUALIZADO]
» Old creature I made
» Creature Creator al 100%
» [Tutorial]Hacer un 'Tutorial' de las funciones del staff para curiosos y para ayudar
» [Súper fácil] Visualizador 3D de Criaturas para tus posts! [Sketchfab] [DESACTUALIZADO]
» Old creature I made
» Creature Creator al 100%
Página 1 de 1.
Permisos de este foro:
No puedes responder a temas en este foro.


 por Zic Jue 31 Oct 2019, 05:44


» TEMA FLOOD
» Experimento Scaver [ZERG]
» El Iceberg Definitivo del Foro [PROYECTO COMUNITARIO]
» Experimento Grifo Fantasmal [SINDROME DEL 23]
» Presentacion y Preguntas
» BlueXYZ
» Hola
» Los experimentos del Dr. Breincrox, parte 2
» Aldeano Mini Carro [O5] [T] [♫]
» [set]: Criaturas de Maenard
» R3-XP10R3 [AI3] [♫]
» Experimento Scarver-T [Virus-T]
» Caballo [3lite vs. Xhaps] [2]
» Esidisi's Tower [O4] [E]
» ¿Que música están escuchando?
» Problema con los pies de DI y otros mods
» Las partes robóticas en mi spore no funcionan bien
» ¿Cómo recuperar una criatura borrada?
» Una decada despues!
» Prototipo Zangief [O3]
» El traveler barato de Owari [TA] [Mx3]
» Golem Guardian [DoT][21] (Golem)